
Best AI Image Generator Tools– 9 That Actually Work in 2026 (Blog#: 92)
You type the perfect prompt, click generate, and get a blurry, strange, unusable image. That is exactly why finding the Best AI Image Generator tools that actually work in 2026 is so important. Most people waste hours trying random tools, only to realize that the Best AI Image Generators are not always the most popular ones. They are the ones that match your needs, whether for social media, ads, thumbnails, or business visuals.
We tested these Best AI Image Generators with real prompts and real results, with no bias, so you do not waste time on tools that look good in reviews but fail in real use. Whether you have no budget or want a premium tool, this list includes both free and paid options, so you can choose the right tool without spending money on features you do not need.
By the end of this guide, you will know exactly which tool to use, why it works, and how to create amazing results on your first try, no design skills needed.
If you are just starting out and want budget-friendly options, check these Best Free AI Tools for Content Creators .
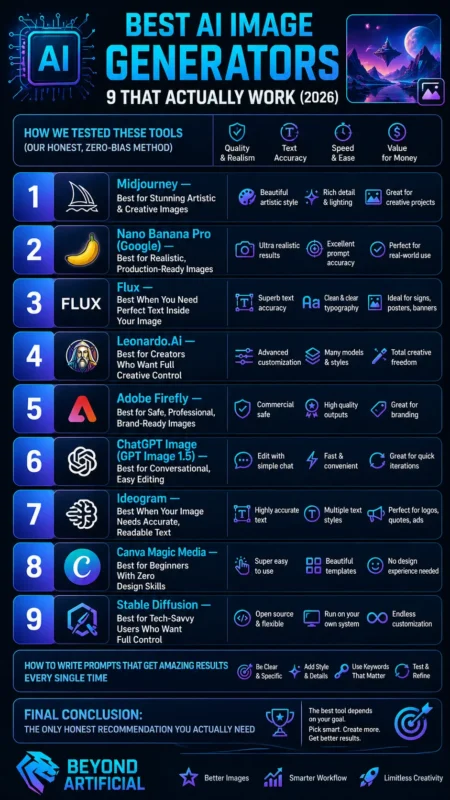
How We Tested These Tools (Our Honest, Zero-Bias Method)
We understand that many people have trusted “top 10 tools” lists before, only to find out they were just paid promotions pretending to be honest reviews, and that can be really frustrating. That is exactly why we tested every tool ourselves using real tasks, real work, and honest results; no brand paid us to promote them or say nice things.
We used the same simple checklist for every tool: ease of use, real performance, fair pricing, and whether a beginner could use it without getting confused.
Step 1: Always try the free trial before buying, because no review (even ours) is better than your own experience. Step 2: Compare at least 3 tools for the same task, so you can judge fairly instead of trusting flashy marketing from one website. Step 2: Check for hidden costs like extra user fees, storage limits, or important features locked behind expensive plans. Step 4: Trust reviews that also mention problems, because if a review only says good things, it is probably trying to sell you something.
We would rather lose a reader than lose your trust.
1. Midjourney: Best for Stunning Artistic & Creative Images
If you have ever typed a creative idea into a free AI tool and felt disappointed by a blurry, lifeless image, Midjourney is the tool that can fix that problem. Midjourney is known for its amazing artistic quality, creating images that look professional and almost magical, with cinematic lighting, beautiful compositions, and visuals that look like movie concept art.
It understands detailed prompts very well and creates strong colors, lighting, and composition with very little editing needed, which means less stress and more exciting results. Step 1: Be clear and detailed in your prompts. Instead of writing “a forest,” try “a misty enchanted forest at golden hour with cinematic light.” More detail gives better results. Step 2: Learn the “–ar” setting early. It controls image size and shape, like –ar 16:9 for widescreen or –ar 9:16 for mobile, and saves you time later.
Step 3: Midjourney images are public by default unless you use a Pro or Mega plan with Stealth Mode. If you are working on client projects or private work, upgrade first. Step 4: Download and save your best images before canceling your plan, because gallery access can disappear after cancellation. Many people lose important work this way, so always keep a backup.
2. Nano Banana Pro (Google): Best for Realistic, Production-Ready Images
If you need an image that looks like a real photo, not like a painting or a dream, Nano Banana Pro is a tool that can really impress you and your clients. It is great for ads, presentations, and marketing because it creates high-quality, realistic images that look ready for professional use. Built on Gemini 3 Pro, Nano Banana Pro understands your prompt better and creates images with strong accuracy. It does not just generate images; it understands what you want.
It is especially good for photo-realistic visuals, creative art, and marketing designs with better text rendering. If broken text in AI images has caused problems before, this tool helps fix that. Step 1: Use the chat editing feature. Upload your image and simply type changes like “make the background a sunny beach” or “remove the chair in the background.” It saves a lot of editing time. Step 2: Be detailed in your prompts. For example, instead of a simple idea, describe lighting, background, mood, and style. More detail gives better results.
Step 3: Use it inside Google Workspace. It works with Google Slides and Google Vids, so you can create visuals directly in your presentation without changing tabs. Step 4: Check for the SynthID watermark. AI-made images include this watermark, so it helps you stay honest and clear with clients and your audience.
3. Flux: Best When You Need Perfect Text Inside Your Image
If you have ever created an AI image that looked beautiful but the text inside was broken, unreadable, or full of strange letters, then you know how frustrating that can be. Flux was made to solve exactly that problem. Flux is very good at creating clear and readable text inside images, which is something many other AI tools struggle with.
That is why it is a great choice for designers, marketers, and content creators who need posters, thumbnails, banners, and social media graphics where every word must look correct. Built by Black Forest Labs, Flux comes in three versions: FLUX Pro for professional work, FLUX Dev for developers and researchers, and FLUX Schnell for very fast image generation.
This means you can choose the right version, whether you need quick results or high-quality client work. Step 1: Always put your text inside quotation marks in your prompt, like “50% OFF TODAY.” This helps Flux understand the exact words you want to show. Step 2: Use FLUX Schnell for quick testing. It lets you try many designs fast before using FLUX Pro for the final high-quality image.
Step 3: Use LoRA fine-tuning for brand style. You can train Flux with your own style, colors, and design look, so your images stay consistent. Step 4: For client or business projects, use FLUX Pro through API platforms for higher resolution images and better final quality without blurry results.
If you also want to turn images into videos, explore Best Video AI Generator, Powerful Tools for Creators
4. Leonardo.Ai: Best for Creators Who Want Full Creative Control
If you have ever used an AI tool that gives you one image and no way to edit or improve it, you know how frustrating that feels. Leonardo.Ai was made to solve that problem. Leonardo.Ai is a complete creative platform used by millions of creators. It offers AI image generation, AI video, canvas editing, upscaling, background removal, and ready-made Blueprint templates, all in one place.
This means you can turn a simple idea into a finished, professional design without changing tools again and again. What makes Leonardo AI special is its strong tools like Realtime Canvas, Ultra Upscaler, and custom model training. It also gives access to powerful models like Nano Banana by Google, GPT Image, Flux, and Leonardo’s own AI models. So instead of using many different platforms, you can do everything in one system.
Step 1:Use Blueprint Templates to save time. These ready-made templates help you create better and more consistent designs faster. Step 2: Train your own custom model. Upload your own images, like your brand style or character design, to create visuals that always match your look. Step 3: Use prompt weighting for better control. For example, writing “(epic lighting:1.5)” helps the AI focus more on that style or mood.
Step 4: Always use the AI Upscaler before downloading. It makes your images sharper, clearer, and more professional by improving quality and details.
5. Adobe Firefly: Best for Safe, Professional, Brand-Ready Images
If you have ever used an AI image tool for a client project and then worried, “Could this image cause legal problems?” then you understand why Adobe Firefly is so important. Adobe Firefly was made to help remove that fear. It is trained on licensed Adobe Stock images and public domain content, which makes the generated images safer for commercial use.
This is why many big companies and agencies trust it for professional work without worrying too much about copyright problems. Firefly is now a complete creative AI platform. It offers Image Model 5 for realistic images, Generate Soundtrack for licensed audio, Generate Speech for voiceovers, batch editing for many images at once, and easy use inside Photoshop, Illustrator, Premiere Pro, and Adobe Express.
This means you can create and edit everything inside the tools you already know. Step 1: Use Generative Fill in Photoshop first. It lets you select part of an image and replace, remove, or expand it using a simple text prompt. It saves a lot of time. Step 2: Train a custom Firefly model with your own brand assets. This helps your AI images always match your brand style, colors, and design.
Step 3: Use Firefly Boards for teamwork. You can upload images, videos, and documents in one place and make creative work easier for your team. Step 4: Use Adobe Brand Intelligence before publishing. It helps check if your content matches your brand rules and avoids mistakes that could hurt client trust.
6. ChatGPT Image (GPT Image 1.5): Best for Conversational, Easy Editing
If you have ever created an AI image that was almost perfect, but one small detail was wrong, you know how frustrating it is to rewrite the whole prompt and lose the parts you liked. GPT Image 1.5 was made to solve that problem. GPT Image 1.5 follows instructions very well and changes only what you ask for. It keeps things like lighting, composition, and people’s appearance the same while fixing small details.
This means you can simply say, Change the background to a sunset, and it will update only that part without ruining the rest of the image. GPT Image 1.5 is fast, smart, and gives better text rendering for designs with words. It also works faster and costs less than many older tools, making it useful for both beginners and professional teams.
Step 1: Talk to it naturally, like you are speaking to a designer. Instead of writing one perfect prompt, you can simply say things like make the jacket darker blue or add softer shadows. Step 2: Use the Images tab in ChatGPT for serious projects. It helps you manage your image history, use editing tools, and keep your work organized.
Step 3: Be specific about the area you want to edit. Clearly say what should change and what should stay the same, like lighting, pose, or background. Step 4: Use it for UI designs, ad creatives, blog covers, and mockups before hiring a designer. It saves time and helps your team work much faster.
7. Ideogram: Best When Your Image Needs Accurate, Readable Text.
If you have ever spent 30 minutes creating the perfect AI image, only to see the text come out looking like broken symbols, spelling mistakes, or complete nonsense, then you know how painful and frustrating that moment feels, especially when it is for a client, ad campaign, YouTube thumbnail, or an important business post. Ideogram was built to fix that exact problem.
And that is why it has become one of the most trusted AI image generators for creating posters, logos, banners, book covers, product ads, and social media graphics where clear, readable text is non-negotiable. Unlike many other tools that fail badly with typography, Ideogram is specially designed for strong text rendering and also gives powerful features like Magic Prompt for smarter prompt writing, Remix for instant design variations, Inpainting for fixing only specific parts, and Canvas Editor for adjusting layouts without destroying your original design.
Step 1: Always place your exact text inside quotation marks, like MEGA SALE TODAY, because this tells Ideogram to treat it as real text, not just part of the design idea, and your results become much cleaner and more professional. Step 2: Do not overload your design with long paragraphs because short, bold phrases like “50% OFF” or “LIMITED OFFER” perform far better, look stronger visually, and save you from messy text errors that ruin trust instantly. Step 3: Use Magic Prompt if you are a beginner because it improves weak prompts automatically.
It helps you create high-quality results even if you have zero design experience or prompt-writing skills. Step 4: Use Remix and Canvas editing instead of generating from scratch every time, because protecting a great design and improving it step by step is smarter, faster, and exactly how professionals create client-ready visuals.
For better ranking and traffic, you can also check Best AI SEO Tools for Small Businesses 2026.
8. Canva Magic Media: Best for Beginners With Zero Design Skills
If opening Photoshop feels like entering a science exam you never studied for, then Canva Magic Media is the beginner-friendly tool that finally makes design feel easy, fun, and stress-free. Canva Magic Media lets you create images, videos, social posts, thumbnails, presentations, and ads just by typing a simple prompt, while features like Magic Design, Magic Edit, Magic Resize, Background Remover, and Brand Kit help you turn messy ideas into polished, professional content in minutes.
It is perfect for beginners because you do not need design skills, expensive software, or hours of tutorials. Just your idea and a few clicks, and suddenly, your content looks like a pro made it. Step 1: Start with ready-made templates instead of a blank page, because templates remove that scary “where do I even begin?” feeling and help you create faster with less stress. Step 2: Use Magic Resize before posting so one design can instantly fit Instagram, YouTube, Pinterest, and Facebook without redesigning everything again, which saves huge time and beginner frustration.
Step 3: Use Magic Edit and Background Remover for quick fixes, because changing one object or cleaning a messy background can make your design look 10x more professional without advanced editing skills. Step 4: Save your fonts, colors, and logo inside Brand Kit, because consistency builds trust, and even a beginner can make their brand look clean, serious, and unforgettable.
9. Stable Diffusion: Best for Tech-Savvy Users Who Want Full Control
If you have ever used an AI image tool and felt frustrated because it gave you results that were close, but never exactly what you wanted, then Stable Diffusion is the tool that gives you real control. Unlike simple AI tools with limited options, Stable Diffusion is open-source and lets you control prompts, styles, poses, backgrounds, and small details exactly the way you want.
It also has powerful features like image-to-image generation, inpainting, outpainting, ControlNet for better structure, LoRA training for custom styles, and local installation, which makes it perfect for designers, developers, and serious creators. Step 1: Use ControlNet when pose, layout, or product position matters, because it helps the AI follow your idea more accurately instead of giving random results.
Step 2: Use LoRA training with your own brand images, characters, or style, because this helps your designs stay consistent and look more professional. Step 3: Install it on your own computer if possible, because this gives you more privacy, unlimited image generation, and no monthly subscription costs. Step 4: Start with easy tools like Automatic1111 or ComfyUI, because learning step by step makes Stable Diffusion much easier and helps you get better results faster.
How to Write Prompts That Get Amazing Results Every Single Time
If you have ever typed a prompt with high hopes and got a weird, blurry, disappointing image instead, trust me: you are not bad at AI, you just need a better prompt strategy. The secret behind amazing AI images is not using fancy words, but giving clear instructions about the subject, style, lighting, background, mood, colors, and camera angle so the tool understands exactly what you want.
The best creators treat prompts like giving directions to a designer, not like guessing magic words, and that simple mindset change can instantly improve your results across tools like Midjourney, Leonardo.Ai, and Ideogram. Step 1: Be specific instead of writing “a dog,” write “a golden retriever sitting in a sunny park at sunset with cinematic lighting,” because details create stronger and more beautiful images. Step 2: Add style words like realistic, cinematic, 3D, watercolor, minimalist, or luxury branding, because style tells the AI how your final image should feel, not just what it should show.
Step 3: Use negative prompts like “no blur, no extra fingers, no messy background,” because telling AI what to avoid is just as important as telling it what to create. Step 4: Save your best prompts in a swipe file, because once you find a prompt that works perfectly, reusing and improving it saves hours of frustration and gives you consistent professional results every time.
Conclusion: The Only Honest Recommendation You Actually Need
After testing all these tools, the most honest truth is this: there is no single best AI image generator for everyone, because the right tool depends on what you actually need, and choosing the wrong one is where most people waste time, money, and confidence. If you want cinematic art, go for Midjourney; if you need clear text inside designs, choose Ideogram.
If you are a beginner, start with Canva Magic Media, and if full creative control matters most, Stable Diffusion is the smarter choice. The real win is not finding the most famous tool; it is finding the one that solves your problem faster, saves your budget, and helps you create work you are actually proud to publish. Step 1: Never buy a paid plan before testing the free version first, because the best-looking tool on paper can feel completely wrong for your real workflow.
Step 2: Choose based on your goal, not hype, because a tool made for social media thumbnails will not perform the same for client ads, product visuals, or professional presentations. Step 3: Save your best prompts, settings, and workflows, because success with AI is often about repeatable systems, not random inspiration.
Step 4: Remember this clearly: the best AI tool is not the one everyone talks about, it is the one that makes your work easier, faster, and more profitable every single day.
If you want to turn these tools into income, explore the Best AI Tools for Making Money
FREQUENTLY ASKED QUESTIONS (FAQs)
Which AI tool is the best image generator?
There is no single best AI image generator for everyone; it depends on your needs. Tools like Midjourney, Ideogram, and Stable Diffusion all lead in different areas like realism, text accuracy, and full control. The best choice is the one that matches your goal, whether it’s social media, ads, or professional design work.
Are there any 100% free AI image generators?
Yes, there are free AI image generators, but most come with limits like watermarks, fewer features, or daily usage caps. Tools like Canva Magic Media, Stable Diffusion, and Ideogram offer free plans with good features for beginners. The key is to pick the right free tool based on your need, text design, realism, or creative control, so you do not feel stuck or disappointed.
Which AI is best for image editing?
The best AI for image editing depends on how advanced and easy you want your editing process to be. Tools like Adobe Firefly, Canva Magic Edit, and Stable Diffusion offer powerful features like background removal, object replacement, inpainting, and smart retouching. The real winner is the one that lets you edit fast, keep quality high, and change only what you need without ruining the whole image.
Best AI image generator for Home design
The best AI tools for home design are those that can turn simple ideas into realistic room visuals. Tools like RoomGPT, Planner 5D AI, and Stable Diffusion help you create interior layouts, furniture styles, and full room makeovers in seconds. Choose the tool that gives realistic space previews, style control, and easy customization for better design results.
Which free AI is better than ChatGPT?
There is no single perfect replacement, but some free AI tools can feel better than ChatGPT for specific tasks. Tools like Google Gemini, Claude, and Perplexity AI are often preferred because they offer stronger research, better writing flow, or real-time information with sources. The best choice depends on what you need: writing, research, or productivity, because each tool is strong in its own way, not everything in one.
Best AI image generator tools free
You search for the best free AI image generator tools, hoping to create something amazing. But most free tools leave you with blurry images, ugly text, watermarks, or frustrating limits that make you feel like giving up. It feels even worse when you spend hours testing random platforms, only to realize the best free tool was never actually built for your real needs, like thumbnails, ads, social media posts, or business graphics.
The good news is that the right free AI image generator can save you time, money, and creative stress if you choose based on your goal, not just popularity. Some tools are better for realistic photos, some for text-heavy designs, and others for beginners who need fast, simple results without design skills.
Once you understand which free tool matches your workflow, creating professional-looking visuals becomes easier, faster, and far less frustrating.
- Choose tools based on your purpose, not hype
- Test free versions before paying for premium plans
- Focus on features like text accuracy, image quality, editing, and speed
- Save your best prompts so great results become repeatable
- The smartest free tool is the one that solves your problem, not the one with the loudest marketing