
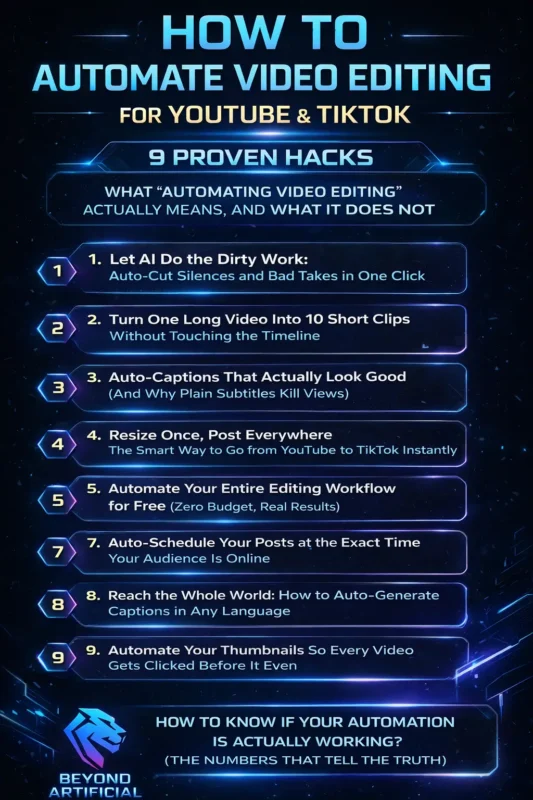
How to automate video editing for YouTube & TikTok -9 ProvenWays (Blog#: 74)
If video editing is taking up your whole day and your content still is not getting views, it is time for How to automate video editing for YouTube & TikTok, which gives you your time back. Many creators who post consistently (even up to 4 times a day) see 5–6% engagement, while others stay stuck editing for hours with little growth. The difference is not effort; it is smart automation.
These 9 proven hacks will show you how top creators automate the most time-consuming parts of editing, so you can stop grinding endlessly and start growing faster. With AI editing tools, simple workflows, and automation systems, you can now create and publish videos in under 10 minutes.
Whether you are running a YouTube channel, a TikTok page, or both, this guide helps you turn your biggest struggle into your biggest advantage.
If you are wondering which tools actually make this possible, check out our guide on the best AI tools for video editing in 2026 to see what top creators are using right now.
What “Automating Video Editing” Actually Means, and What It Does not.
Let’s be real, when people hear automated video editing for YouTube & TikTok, they imagine a robot doing everything while they relax… but that is not how it works. Automation does not replace you; it supports you. It means you focus on the important things (your ideas, story, and message), while tools handle repetitive tasks like cutting silence, adding captions, and resizing videos.
Your creativity stays yours, AI just helps speed things up. Start simple: Pick ONE task this week, like removing silences, and use a tool like Gling or Descript. You will instantly feel the time saved. Work smart, not full auto: Top creators automate about 60–75% of their workflow, but keep full control of their content and voice. Always do a quick check: Before posting, spend 2 minutes reviewing your video. Add a real reaction, a natural moment, that is what makes people connect.
Once you understand this, everything changes: Less stress, more content, and real growth starts to feel possible.
1. Let AI Do the Dirty Work: Auto-Cut Silences and Bad Takes in One Click.
You know that painful moment when you sit through your raw footage, hearing every “um,” every awkward pause, every mistake… It is exhausting, and honestly, it makes a lot of creators quit. But now, AI can handle all of that for you, in just one click. Tools like Gling automatically remove silences and filler words, so you spend less time editing and more time creating. Normally, editing 1 minute of video can take 30–60 minutes. But with AI auto-cut tools, it can be done in just a few minutes.
Tip 1: Record smarter: Before recording, sit in a quiet place and speak a little slower than normal. Cleaner audio = better AI cuts = less editing work. Tip 2: Do not over-edit
Never set silence removal to maximum. Keep small natural pauses; your video will sound robotic. Always review before posting
AI is fast, but not perfect. Check your video to make sure no important words or moments were cut.
Once you try this, you will see how 45 minutes of editing turns into just 3 minutes, and that is when things finally start getting easier. To understand how this fits into a complete system, follow this AI video editing workflow step-by-step 2026 guide, which shows exactly how creators automate their process from start to finish.
2. Turn One Long Video Into 10 Short Clips Without Touching the Timeline.
Think about it, you spend hours making one great YouTube video… and it gets 200 views. Meanwhile, other creators take that same video, turn it into 5 TikToks, and grow 10x faster. That advantage is no longer out of reach. Now, AI can turn one long video into 10 ready-to-post short clips, without you touching the timeline. Tools like OpusClip and WayinAI scan your video, find the best moments (funny parts, key points, emotional highlights), and turn them into vertical 9:16 clips with captions, ready for TikTok, Reels, and Shorts.
Some tools even give a virality score, so you know which clip to post first. Tip 1: Guide the AI. Before uploading, add 3–5 keywords about your video. This helps the AI pick the moments that actually matter. Tip 2: Record with clips in mind. Every 5 minutes, add a strong moment, a key tip, reaction, or quote. This gives the AI perfect content to cut.
One creator reduced editing time from 200 hours to 80 hours and used that extra time to grow their audience instead of burning out. Your content is already sitting in your camera roll. All it takes is 30 seconds to upload, and let AI do the rest.
3. Auto-Captions That Actually Look Good (And Why Plain Subtitles Kill Views).
Here is a hard truth: you can create an amazing video, but still lose most viewers just because of boring subtitles. Plain white captions do not just look simple anymore; they make your content feel low effort. And in 2025, that kills attention instantly. Most people watch TikTok without sound, which means your captions are basically your voice. That is why styled captions matter.
AI tools like Submagic and OpusClip can now create animated, eye-catching captions (highlighted words, colors, emojis) in under a minute, no design needed.
Tip 1: Highlight keywords. In every sentence, make one important word bold or a different color. This grabs attention and makes people stop scrolling. Tip 2: Match your style to your content. Fast content → big, bold, animated captions. Calm/educational → clean and simple captions. If the style does not match, viewers lose connection.
Tip 3: Place captions correctly. Do not put them too high or too low, UI buttons will cover them. Keep them in the center “safe area” so everything stays visible. Once you switch from plain subtitles to styled captions, you will notice better watch time and engagement, even on your very first video.
If your goal is not just automation but higher watch time, learn how retention editing doubles your views and keeps people watching till the end.
4. Resize Once, Post Everywhere: The Smart Way to Go from YouTube to TikTok Instantly.
If you have ever recorded one good video and then spent hours resizing it for YouTube, TikTok, and Reels, only to mess up the crop, you already know how frustrating this is. This is one of the biggest reasons creators give up on posting on multiple platforms. But now, AI can handle this for you. Tools like Luma AI automatically detect your face or main subject and adjust the framing for each platform, turning one video into multiple formats (TikTok, Shorts, Reels) from a single upload.
Posting a horizontal video on TikTok without resizing adds black bars and makes your content look low effort, which hurts your reach. Tip 1: Record smart: Keep yourself centered with a bit of space on both sides. This helps AI crop your video perfectly without cutting anything important.
Tip 2: Always preview: Before exporting, quickly check the AI version. Sometimes it can miss wide shots; a quick review saves you from mistakes. Tip 3: Build a simple system
Upload once → generate all formats → schedule everything. One video can turn into a full week of content. Once you stop treating YouTube and TikTok as separate work and let AI handle the formatting, everything becomes faster, easier, and much more scalable.
5. Automate Your Entire Editing Workflow for Free (Zero Budget, Real Results).
One of the biggest myths is that you need expensive tools to automate video editing; you do not. In 2025, you can build a full YouTube + TikTok workflow using completely free tools. Tools like CapCut, Canva, ChatGPT (free), and Vizard give you everything, editing, captions, scripts, and templates, without spending any money. The real difference is not budget… It has a system.
Tip 1: Use a simple free stack. CapCut (AutoCut) → clean your footage. Vizard → create short clips. Submagic → add styled captions. That is a complete workflow for $0. Tip 2: Batch your work monthly. Most free tools reset credits every month. Edit all your content in one session to use everything efficiently. Tip 3: Avoid watermarks. Always check if a tool adds a watermark. Use tools with “no watermark” exports so your content looks professional.
You do not need money to grow; you need a clear system. And today’s free tools are powerful enough to build a real audience from scratch.
6. Make Hundreds of Videos at Once Using Just a Spreadsheet.
Imagine this: you spend one Sunday filling a simple Google Sheet with 50 video ideas, hooks, and CTAs… then press one button and walk away. By the time you wake up, you have 50 ready-to-post videos. That is not a dream anymore; tools like Creatomate and Fliki can actually do this. Here is how it works: You create one video template, connect it to a spreadsheet, and each row turns into a unique video automatically. No manual editing. No repeating work. Some creators have even made hundreds of videos in minutes using this method.
Tip 1: Start simple: Use easy formats like quotes, tips, “did you know,” or product clips. These work best with templates. Tip 2: Make each video feel unique: Add different text, images, or voice styles in your spreadsheet. So even if it is the same template, it doesn’t feel repetitive. Tip 3: Let AI fill your content. Use ChatGPT to generate 50 hooks, ideas, or titles. Paste them into your sheet, and let the system do the rest.
Once you try this, you can create a full month of content in one afternoon. And that is the real shift, from slow, manual work… to fast, scalable growth.
7. Auto-Schedule Your Posts at the Exact Time Your Audience Is Online.
There is a hidden reason why two similar videos get completely different results: posting time. You can have the same quality, same topic, same editing… But if one is posted at the right time, it can get 50,000 views while the other gets 400. Why? Because the first hour matters most, and videos posted at peak times get much higher watch time early on. That is what platforms use to decide if your video should go viral.
Now, AI tools can handle this for you. They analyze your audience and automatically post your videos at the best time, even while you are offline. Tip 1: Check your real data
Go to TikTok Analytics → Followers → “Most Active Times.” Use this instead of guessing. Tip 2: Engage immediately. When your video goes live, spend 20–30 minutes replying to comments. This boosts early engagement and can double your reach.
Tip 3: Check your timezone. Always make sure your scheduler is set to your audience’s timezone, not yours. Posting at the wrong time can kill your reach. Many creators now schedule all their content in one day, then spend the rest of the week focusing on growth instead of posting. Once you experience videos going live at the perfect time, without you doing anything, everything feels easier, and your results start improving.
8. Reach the Whole World: How to Auto-Generate Captions in Any Language.
Right now, millions of people in other languages are searching for your content, but they can not find you. Not because your content is bad… But because it is only in one language. That one step, captions in other languages, can unlock a huge new audience. AI tools can now translate your captions into 90+ languages automatically, so one video can reach people in Brazil, Spain, India, and more, without recording anything again.
Tip 1: Start with the biggest audiences. Go for Spanish and Portuguese first. They give you access to massive, highly active viewers with one simple translation. Tip 2: Do a quick check. AI is fast, but not perfect. Just scan the captions to make sure they sound natural. Tip 3: Think views + money. For reach → Spanish, Portuguese, Hindi. For higher earnings → German, Dutch, Australian English. Right now, very few creators are doing this, which means less competition and faster growth for you.
Once you start adding multiple languages, you stop being just a local creator… and start growing as a global one, without extra work.
9. Automate Your Thumbnails So Every Video Gets Clicked Before It Even.
Here is a tough truth: your video can be amazing, but if your thumbnail is weak, it will still flop. Because the thumbnail is not just part of your strategy… It decides whether anyone even clicks your video. You have less than half a second to stop someone from scrolling. The good news? AI can now help. AI thumbnail tools can boost your click-through rate by 20–40%. They analyze top videos in your niche and create thumbnails with proven elements, strong colors, clear text, and eye-catching visuals.
What used to take 2 hours can now be done in seconds. Tip 1: Test multiple thumbnails. Create at least 3 versions and test them. Let real audience clicks decide the winner. Tip 2: Use strong facial expressions. Thumbnails with clear emotions (surprise, excitement, eye contact) perform much better than neutral ones. Tip 3: Stay consistent. Use the same colors, fonts, and style across your channel. This builds recognition and improves clicks over time.
Once you start treating thumbnails as the most important part, not an afterthought, your results can change fast.
How to Know If Your Automation Is Actually Working (The Numbers That Tell the Truth).
One of the worst feelings is doing everything right, automating, posting consistently, using all the tips, and still not knowing if it is actually working. That confusion ends here. You only need to track 3 key numbers:
- Completion rate → Are people watching till the end?
- Saves → Do people find your content valuable?
- Click-through rate (CTR) → Are people even clicking?
Step 1: Set your baseline. Take a screenshot of your current stats, views, completion rate, CTR, and follower growth. Without this, you will not know what is improving. Tip 1: Watch completion rate. Check “Watched Full Video %” in analytics. If it drops after automation, your edits may be too aggressive. Tip 2: Focus on saves, not likes. Saves mean real value; people want to come back. This matters more than thousands of quick likes. Tip 3: Keep it simple. Do not overthink the data. Check once a week → fix one thing → keep posting.
If your completion rate, saves, and CTR are going up, your system is working. At that point, do not stop. Just trust it and keep going.
Keep reading our full guide on how to automate video editing with AI to build a complete system that scales your content without burning you out.
FREQUENTLY ASKED QUESTIONS (FAQs)
How to get TikTok to automatically edit videos?
TikTok has a built-in AutoCut feature that edits your videos automatically, no extra apps needed. Just open TikTok, tap “+”, upload your clips, and select AutoCut (or find it in Effects). It will trim, sync, and add transitions for you in seconds. What used to take 45 minutes can now be done in under a minute, fast, simple, and beginner-friendly.
Is there a way to automate video editing?
Yes, video editing can be fully automated, and it is simpler than you think. AI tools can scan your footage, pick the best parts, and create a ready-to-edit video in minutes, including cuts and audio sync. You can even set up a full automated workflow using simple tools, without any technical skills.
Can AI make a TikTok edit?
Yes, AI can create TikTok-ready videos in seconds, even if you’ve never edited before. Tools like InVideo AI can generate full videos from a simple text prompt, while Vizard can turn one long video into multiple short clips with captions and perfect formatting, ready to post instantly.
What is the best video editing software for YouTube and TikTok?
Choosing the right tool matters for YouTube and TikTok editing. CapCut is the best free option, it offers AI features like auto-captions, filler removal, and easy resizing. PowerDirector is better for advanced users, with more powerful editing and AI tools. Start simple with CapCut, then upgrade if you need more control.
What is the golden rule of editing?
The golden rule of editing is simple, if it does not add value, cut it. Always focus on the story first, not on fancy effects or technical tricks. Great editing should feel smooth and natural, your audience should feel the message, not notice the editing. When in doubt, keep it simple and let your content do the talking.
How to automate video editing for YouTube & TikTok for free
You have been doing everything yourself, recording, editing, posting, and still feeling behind while others grow faster. That frustration is real. But here is the truth: you do not need money to fix it, you need a system. In 2025, creators are already automating most of their work using free tools… while others are still spending hours on tasks that should take minutes.
Here is what free automation can do for you:
- Cut silences automatically: Use CapCut AutoCut (no manual trimming)
- Turn 1 video into 10 clips: Use Vizard (AI finds best moments)
- Add styled captions: Use Submagic or OpusClip (no design needed)
- Resize for all platforms:Use Kapwing (perfect framing in seconds)
- Schedule posts automatically: Use TikTok’s built-in scheduler
- Create clickable thumbnails: Use free AI thumbnail tools
All the repetitive work, cutting, captions, and resizing is now handled by AI. So you can focus on what actually grows your channel: your ideas, your message, and your strategy. Your problem was never the budget. It did not have the right system. Now you do.